Guides on this page
1 Setting up an export for your payroll system ▼
Payroll Export turns the hours Syncro Connect has calculated into a file your payroll software can import. Set up a profile once for your payroll system, and every export after that takes a few clicks.
Where to find it: Time and Attendance, then Payroll Export on the left-hand menu.
Step 1: Choose your payroll system
- Under Export profiles, click Add payroll system.
- Choose your system. Syncro Connect currently supports QuickBooks Advanced Payroll, Sage 50 Payroll, Staffology Payroll (also used for IRIS Every Payroll), IRIS Payroll (Payroll Business, Bureau Payroll and PAYE-Master), BrightPay and Moneysoft Payroll Manager.
- If yours is not listed, choose Not listed? to tell us which system you use.
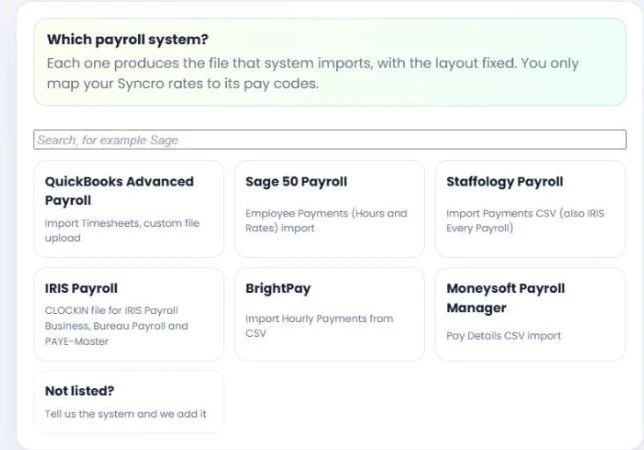
The file layout is fixed to match what your payroll system imports, and the panel explains how to set that system up for the import.
Step 2: Map your rates to payroll codes
- Give the profile an Export name.
- Under Pay rates, tick each Syncro Connect rate you pay, such as Basic, Overtime, Holiday or Standard Sick, and enter the code your payroll system uses for it.
- Tick any System rates you need, such as Flexi paid hours or Flexi deduction, and any Calculations, such as Days attended.
- Click Save profile.
Only the rates you tick are exported. If a rate is left unticked, its hours are left out of the file, so make sure every rate you pay is mapped.
Using Sage 50 Payroll? Each person’s payroll number in Syncro Connect must be their Sage employee reference, and each payment reference must be a Variable pay element already assigned to the employee in Sage. Import the first file for one person and check their hours in Sage before you run payroll.
2 Building a custom export profile ▼
If your payroll system is not on the list, or you need a different layout, build a custom profile. You choose the file type, the columns and how the figures are formatted.
Step 1: Start a custom profile
Under Export profiles, click New custom profile. Give it an Export name and choose the File type: CSV, Excel (.xlsx) or PDF.
Step 2: Choose the employee identifiers
Tick the identifiers you need, such as Payroll No, First Name and Surname. Use the arrows to put them in the order your payroll system expects.
Step 3: Set the file options
- Whether to include column headers and output zero values.
- Time format: HH:MM or decimal, with a colon, dot or no separator.
- Decimal style: always two decimal places (45.00), or trimmed (45, 47.5).
- For CSV files: the delimiter (comma or pipe), line endings and quoting.
Step 4: Add an extra column if needed
Some payroll systems need a period date or a fixed value on every line. Choose the period start date, period end date or fixed text, and the date format. It sits after the employee identifiers and before the payroll code.
Step 5: Map your rates and save
Tick each Syncro Connect rate to include and enter its payroll code, then click Save profile.
To make a variation of a profile you already have, select it and click Duplicate, then change what you need.
3 Running the payroll export ▼
Each pay period, preview the export to check the figures and any warnings, then download the file and import it into your payroll software.
Step 1: Choose the profile and period
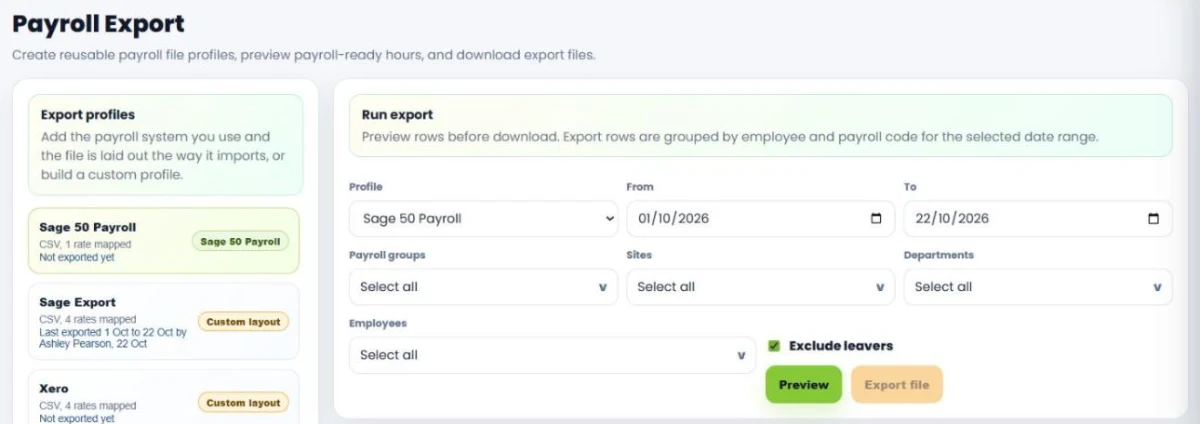
- Under Run export, choose the Profile.
- Set the From and To dates for the pay period.
- If you only want some of your staff, narrow it by Payroll groups, Sites, Departments or Employees.
- Leave Exclude leavers ticked unless you are paying people who have left.
Step 2: Preview and check the warnings
Click Preview. The rows are grouped by employee and payroll code. Tick Show employee name to make them easier to check, and View mapping key to see which code is which rate.
Read any warnings above the rows before you export:
- Rows linked to unresolved exceptions: some sessions in the period are still waiting in the Clocking Hub.
- Hours in rates this profile does not map: those hours will not be in the file. Edit the profile and tick the rate to include them.
- Flexi no-show decisions outstanding: flexi decisions still need making in your Inbox.
Step 3: Export the file
Click Export file to download it, then import it into your payroll software. The profile shows when it was last exported, for which dates and by whom.
Clear your Clocking Hub exceptions and outstanding decisions before you export, so the file holds the final figures.