Guides on this page
1 Finding your way around Settings ▼
Settings holds the company-wide setup behind Syncro Connect. Each area shows whether it is set up, so you can see at a glance if anything still needs attention.
Step 1: Open Settings
- Click the cog at the top right.
- Choose the module you want: Syncro, Access Control, Visitors, Fire or HR. A module that is not part of your licence opens a locked page instead.
Step 2: Choose a settings area
Under Syncro, each area has a card marked Setup complete or Requires attention, with a short note on what is missing. Click Open settings on the card.
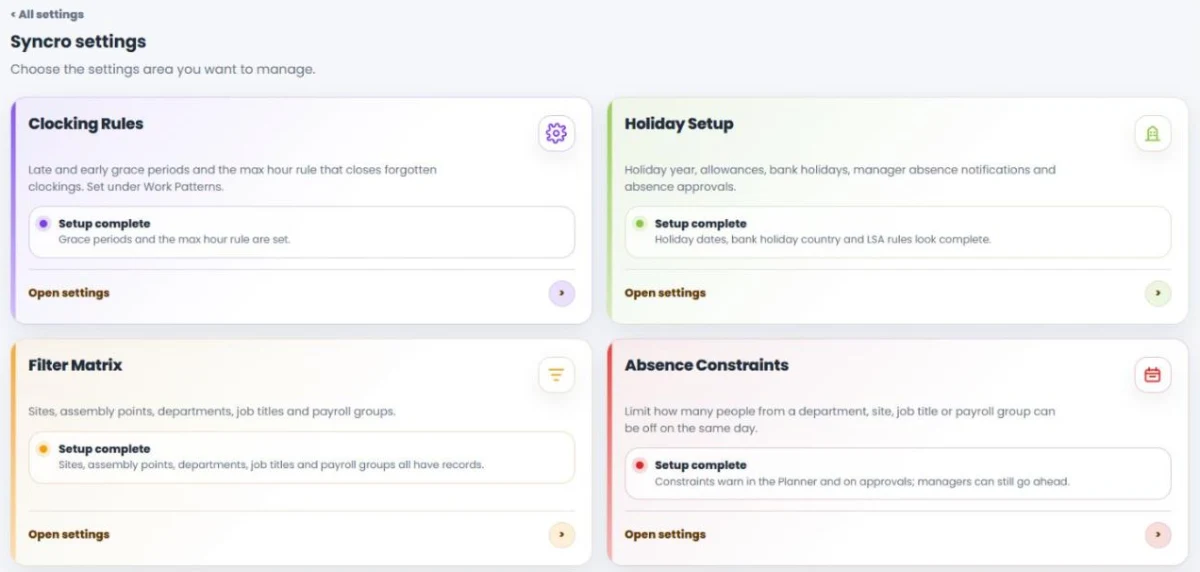
- Clocking Rules: grace periods and the max hour rule. These open in Work Patterns, under Global settings.
- Holiday Setup: holiday groups, the holiday year, bank holidays, notifications and year end.
- Filter Matrix: sites, departments, job titles, payroll groups and assembly points.
- Absence Constraints: limits on how many people can be off at once.
- Planner Codes: the codes you book absences against. See Creating absence codes for the planner.
- Device Config and Device Maintenance: your clocking devices, where each one sits, and actions sent to them.
- Flexi: switch Flexi Time on or off. See the Flexi guides.
- Syncro Kiosk and Scanner Connect: shared tablets and QR badges for clocking and self-service.
Use All settings at the top of an area to go back to the list of modules.
2 Holiday Setup at a glance ▼
Holiday Setup is where your company holiday rules live. It is split into tabs, so you can go straight to the part you need.
Where to find it: Settings, Syncro, then Holiday Setup.
- Holiday Groups: your entitlement groups, in days or hours, and the fallback group given to new starters and anyone without a group. See Creating a holiday group.
- Rules: when the holiday year starts, the default unit and allowance for new starters, and how pro rata is worked out.
- Long Service: extra entitlement awarded for length of service.
- Bank Holidays: create bank holiday bookings, choose the pay rate and decide how entitlement is affected. Book current staff creates approved bank holiday bookings for everyone active.
- Notifications: which managers receive absence emails and mobile alerts.
- Year End: preview the rollover, create the new holiday year and check the carry-forward.
Year End changes everyone’s holiday balances. Use the preview first, and call us if you are unsure before running it.
3 Setting up sites, departments and other filters ▼
The Filter Matrix holds the lists you use to group your people: departments, sites, job titles, payroll groups and assembly points. They are used for filtering across reports, the Planner and the Clocking Hub.
Step 1: Open the Filter Matrix
Go to Settings, Syncro, then Filter Matrix. Choose the tab you need: Departments, Sites, Job Titles, Payroll Groups or Assembly Points.
Step 2: Add an entry
Type the name, for example a new department, and click the add button. It is available straight away.
Step 3: Assign it to people
Open the person in People and set it on their Filters tab.
Each entry shows how many employees use it. You can only delete one that nobody uses, shown as Safe to delete, so move people off it first.
4 Limiting how many people can be off at once ▼
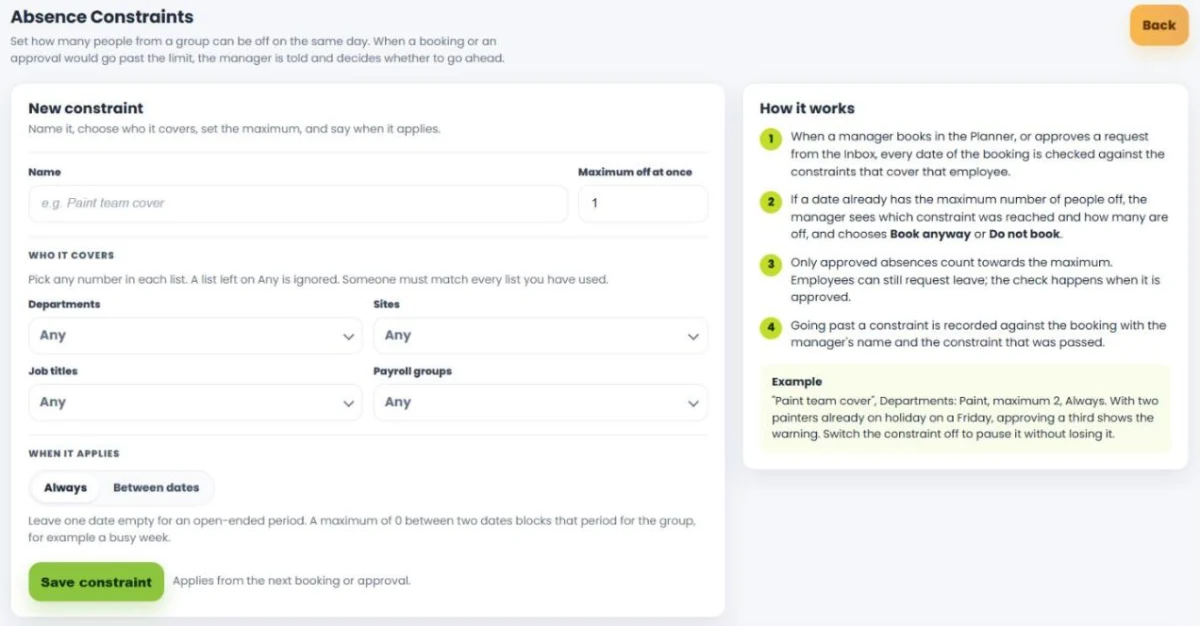
Absence constraints set the maximum number of people from a group who can be off on the same day. When a booking or approval would go past the limit, the manager is warned and decides whether to go ahead.
Step 1: Create the constraint
- Go to Settings, Syncro, then Absence Constraints.
- Give it a Name, for example Paint team cover, and set the Maximum off at once.
Step 2: Choose who it covers
Pick departments, sites, job titles or payroll groups. A list left on Any is ignored, and a person must match every list you have used.
Step 3: Choose when it applies
Choose Always, or Between dates. Leave one date empty for an open-ended period. A maximum of 0 between two dates blocks that period for the group, for example a busy week.
Step 4: Save
Click Save constraint. It applies from the next booking or approval.
What happens next
- When a manager books in the Planner or approves a request, every date is checked. If the limit is reached, they see which constraint and how many are off, and choose Book anyway or Do not book.
- Only approved absences count. Staff can still request leave; the check happens when it is approved.
- Going past a constraint is recorded against the booking, with the manager’s name.
Switch a constraint off to pause it without losing it.
5 Setting up Syncro Kiosk tablets ▼
Syncro Kiosk turns a shared tablet into a self-service point. Staff sign in with their card, or their clock number and PIN, to request leave and check their holidays and hours.
Step 1: Pair the tablet
- Go to Settings, Syncro, then Syncro Kiosk.
- Enter a Tablet name, choose its Site, and click Create pairing code.
- Open Syncro Kiosk on the tablet and enter the code. Each code works once and lasts 15 minutes.
Step 2: Set the kiosk settings
- Admin PIN: 4 to 12 digits. It opens a tablet’s settings and is needed to unpair it there.
- Sign out after: how many seconds without a touch before the tablet signs the person out.
Step 3: Let people use it
Switch it on for each person in People, on their Mobile app tab, with Allow Syncro Kiosk sign-in. What they see follows their mobile app group.
The Tablets list shows each tablet’s site, whether it is online, when it was last seen and its app version. Recent sign-ins shows who used which tablet and how they signed in.
6 Printing Scanner Connect badges ▼
Scanner Connect lets a manager clock people in and out by scanning a QR badge with the Scanner Connect phone app, useful on sites without a clocking machine.
Step 1: Print the badges
- Go to Settings, Syncro, then Scanner Connect.
- Tick the people you want, or Select all shown, then click Print selected.
Step 2: Allow the manager to scan
Switch it on for each manager who will scan, in People, on their Mobile app tab, with Allow Scanner Connect sign-in.
The list shows each person’s clock number and site, so you can check you are printing the right badges.