Guides on this page
1 Running a report ▼
Reports pull your attendance, absence and employee data into one view that you can check on screen, export or send to a colleague. Every report runs the same way.
Where to find it: Time and Attendance, then Reports on the left-hand menu.
Step 1: Find the report
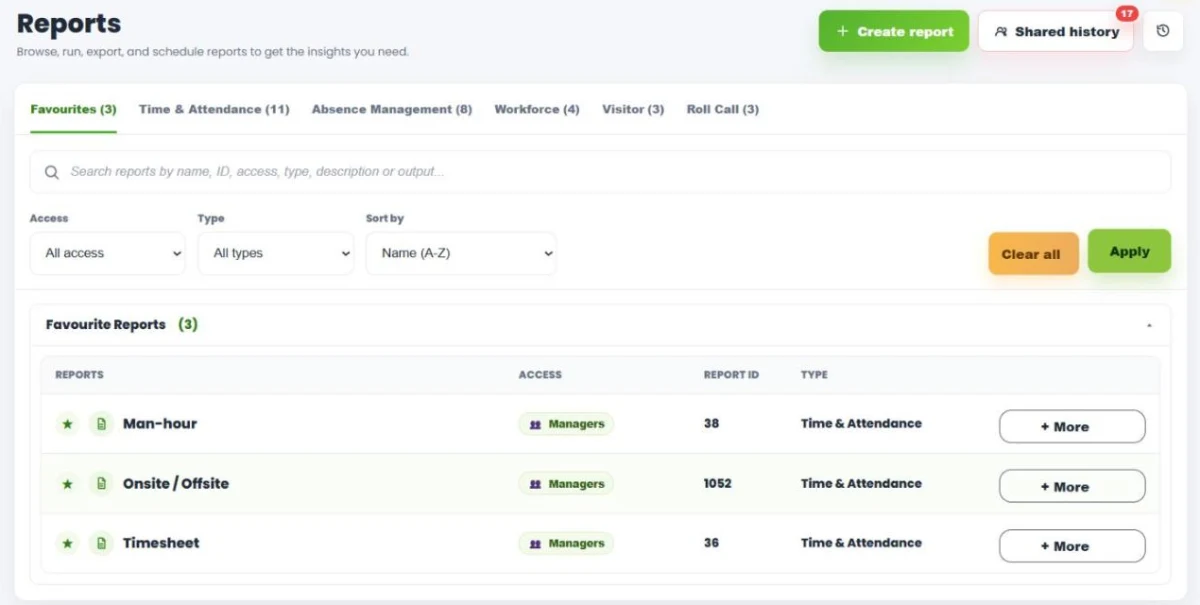
- Reports are grouped into tabs: Favourites, Time & Attendance, Absence Management, Workforce, Visitor and Roll Call.
- Type in the search box to find a report by its name, ID, type or description. You can also narrow the list with Access, Type and Sort by, then click Apply.
- Reports marked with a star appear in your Favourites tab, so the ones you use most are always at the top.
Step 2: Open the report
- Click + More next to the report. A panel opens on the right with three tabs: Run, Preview and Schedule.
- If you are not sure it is the right report, click Preview. This shows a short description, the columns the report contains and the filters it will use.
Step 3: Choose your filters
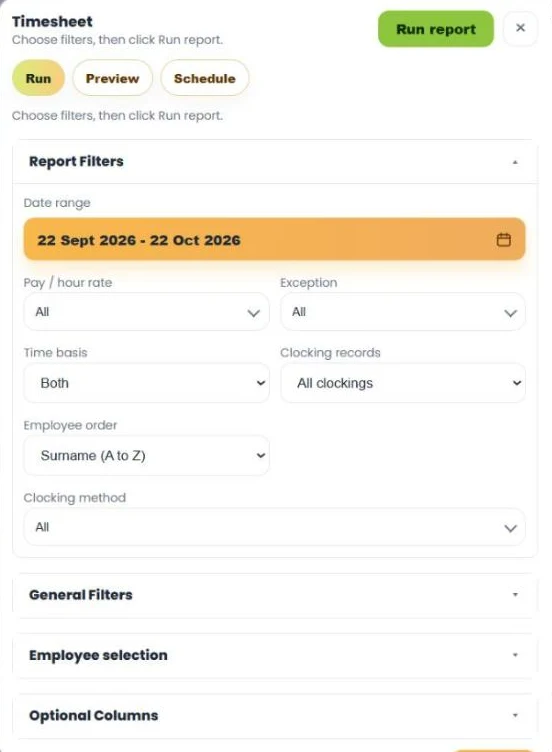
Go back to the Run tab. The filters are split into sections you can open and close:
- Report Filters: click the orange date bar to set the date range. Other options depend on the report. For example, the Timesheet report lets you choose the Time basis (Paid, Actual or Both), show All clockings or only Edited clockings, and set the Employee order.
- General Filters: narrow the report by status (Active or Inactive), department, job title, site, payroll group, schedule, access level or assembly point.
- Employee selection: tick the people you want. Leave everyone unticked to include everybody who matches your other filters.
- Optional Columns: add extra fields to the report, such as Site, Department, Schedule, Expected Hours, Clocking Source, Edited By or Approval Status.
Step 4: Run the report
- Click Run report. The button shows Running while the report builds, then the results open in a new browser tab.
- Totals for the whole period are shown across the top. Below them, each employee has their own block with a row per day and their totals.
- Use the search box to jump to one person. On reports that show clockings, the Open button on a row takes you straight to that day in the Clocking Hub, so you can correct it.
If nothing appears after you click Run report, check that your browser has not blocked the new tab. Allow pop-ups for syncroconnect.com and run it again.
2 Exporting, printing or sharing a report ▼
Once a report is open, you can download it, print it, or send it to another manager’s inbox so they can check it.
Step 1: Export or print
- Run the report so it opens in its own tab.
- Click Export at the top right and choose CSV, Excel (.xlsx), PDF or Print.
Step 2: Share the whole report
- Click Share at the top right. The Share report panel opens.
- Search for the managers you want to send it to and tick their names.
- Add an Inbox note if you need them to do something, then click Share to inbox.
Step 3: Share one person’s section
Each employee’s block has its own Share block button. Use it to send just that person’s figures, for example when you need a manager to check one person’s hours before payroll.
Shared reports land in the other person’s Inbox and open straight into the same report run, so you are both looking at exactly the same figures. A short note, such as “please check Tuesday’s clock out before payroll”, tells them what you need.
3 Scheduling a report to arrive automatically ▼
If you run the same report regularly, schedule it instead. Syncro Connect runs it at the time you choose and drops it into your recipients’ inboxes.
Step 1: Open the Schedule tab
- In Reports, click + More next to the report, then click the Schedule tab.
- Any schedules already saved for the report are listed here, with the next run time, when it runs, who receives it and the filters it uses. Use the buttons beside a schedule to edit, pause or delete it.
Step 2: Create the schedule
- Click New schedule.
- Give it a Schedule title and set the Run time.
- Choose the Delivery pattern: Every day, or Selected weekdays.
- Under Recipients, tick the people who should receive it.
Step 3: Set the filters
Set the same filters you would use to run the report. The date range is relative: Today, Yesterday, This week, Last week, This month or Last month, so it always covers the right period when it runs.
Step 4: Save
Click Create schedule. The schedule appears in the list with its next run time.
You can save more than one schedule for the same report. For example, send the Timesheet for Last week every Monday morning, with one schedule per department filtered to that manager’s team.
4 Working through reports in your inbox ▼
Reports that are shared with you, or sent by a schedule, wait in your Inbox until you mark them complete. The dashboard shows how many are still to review.
Step 1: Open your reports
- Click Inbox on the left-hand menu, then the Reports tab.
- Reports still to deal with are under Waiting. Each one shows the report name, the date it was sent, any note from the sender, and whether you have opened it yet.
Step 2: Review and action
- Open report: opens the report run on screen.
- PDF: opens a PDF copy.
- Reply: respond to the person who sent it, for example to confirm you have made a correction.
- Mark complete: moves the report to the Completed list once you are done.
Mark reports complete as you go. Anything left in Waiting keeps counting towards Reports to review on your dashboard.
5 Creating your own report ▼
If none of the standard reports shows what you need, build your own. A custom report uses one source of data and the columns, filters and sort order you choose.
Step 1: Start a new report
In Reports, click Create report at the top right. The Create custom report panel opens with seven stages along the top. Work through them in order.
Step 2: Choose the source and identity columns
On 1. Identity, pick the Report source:
- Workforce / employee: one row per employee, built from their profile.
- Attendance / T&A: one row per attendance record, with work dates, shifts, paid time and exceptions.
- Absence requests: one row per absence request, including approved, pending and cancelled ones.
Then choose the identity columns, such as name, payroll number, department and site. Default columns gives you a sensible starting set.
Step 3: Add employee details and report data
On 2. Employee info, add any extra employee fields, such as email, start date or contracted hours. On 3. Report data, choose the attendance or absence columns for that source.
Some fields are marked Sensitive, such as date of birth and National Insurance number. Only include them if everyone who can see the report needs them.
Step 4: Filters and sort order
On 4. Filters, choose the filters that will be offered when the report is run. On 5. Sort, set the default sort field and direction.
Step 5: Review and save
- 6. Review shows the source, selected columns, filters and any warnings.
- On 7. Save, enter a Report name and Description, choose the Report type (which decides the tab it appears under) and set Visibility to Private, Admins or Managers.
- Click Create report.
Each custom report uses a single source so attendance, absence and employee data cannot be mixed by mistake. If you need more than one type of data, create a separate report for each.