Syncro Connect guides
Absence management
Book and manage holidays, sickness and other absences for your team, and keep the planner calendar up to date.
Guides on this page
- Booking holiday or sickness manually
- Creating a global booking or company shutdown
- Creating absence codes for the planner
- Approving a holiday request
- Editing or deleting a booking
- Creating a holiday group
- Changing an employee’s holiday group
- Making a one-off holiday adjustment
- Viewing and exporting a summary of absences
1 Booking holiday or sickness manually ▼
As a manager or admin, you can book holiday, sickness or other absences for an employee directly from the Planner, rather than waiting for them to request it through the mobile app.
Step 1: Open the Planner and choose the dates
- Open Syncro Connect as a manager or admin, and click Planner on the left-hand menu.
- Select the dates you need. Click a single date, or drag across several to book more than one day, for example the 23rd of September.
- A pop-up window appears from the right-hand side.
Step 2: Set the booking details
- Select the employee you are booking for.
- Choose the group: Holiday, Bank Holiday, Sickness, Absence, Training or Other.
- Choose a subtype within that group. Subtypes are ones you set up yourself, see Creating absence codes for the planner below.
- The date range is already filled in from what you selected, but you can change it if needed.
- Choose the Day part: a full day, or a morning or afternoon for a half day.
- Leave Book working days only ticked so weekends and other non-working days in the range are skipped.
- Add a Note if it helps, for example the reason for the absence.
Step 3: Check the pay and save
- The paid hours come through automatically from the code and the person’s schedule. To change them, tick Override pay and enter the hours or rate.
- Scroll down to the Booking preview. It shows the dates booked and any skipped, the paid rate, scheduled time, any break deducted, paid hours, and for holiday the current balance, the deduction and the projected balance. Read any warnings it shows.
- Click Save booking. A Confirm booking window shows the employee, type, dates, pay and deduction. Click Save booking again. If there are warnings, it asks you to confirm you want to save anyway.
- Bookings made by a manager are approved straight away. Holiday comes off the person’s balance automatically; other groups are recorded for reporting.
Booking sickness
Follow the same steps, but set the Group to Sickness. Sickness does not come off holiday entitlement, and it shows in red on the Planner.
Choose the sickness subtype that matches how you pay sickness, for example Standard Sick or Sick pay less SSP. The subtype sets the pay, so picking a general default can pay the wrong rate.
Booking from the Planner is the quickest way to record an absence you already know about, for example when someone tells you in person rather than requesting it through the app.
2 Creating a global booking or company shutdown ▼
A global booking applies an absence to everyone at once, ideal for a company shutdown such as Christmas. You can also limit it to a particular site or department.
Step 1: Open the global booking window
- Log in as an admin or manager and select Planner on the left-hand menu.
- On the top menu bar, click the orange Global Booking button.
Step 2: Choose who it applies to
- By default, Entire Company is already selected.
- To book for just one site or department instead, untick Entire Company and the filters will appear for you to choose.
- For a whole-company shutdown, leave Entire Company ticked.
Step 3: Set the booking details
- Select the group and subcode. Subcodes are set up yourself, see Creating absence codes for the planner below.
- Select the start and end date, and whether it is a full, first half or second half shift.
- Add an optional note if you want.
- Make sure Booked Working Days Only is ticked.
Booked Working Days Only means weekends, and non-working days for part-time staff, are not deducted from anyone’s holiday. Leave it ticked so people are not charged for days they were never going to work.
Step 4: Save
- Click Save. You will be prompted to confirm, then click Save Booking.
3 Creating absence codes for the planner ▼
Absence codes (planner codes) are the subtypes you book against in the Planner, for example a specific type of sickness or holiday. Set them up once with their own name, colour and pay rate, and they become available to book.
Step 1: Open planner codes
- Log in to Syncro Connect as a manager or admin.
- In the top right corner, click the settings cog.
- From the grid of tabs, select Planner Codes.
- You will see a grid of your existing absence types, each with its own colour, name and paid rate.
Step 2: Create a new code
- On the top bar, select the group to add to, for example Sickness.
- Give the code a name, for example Work Related Injury.
- Add a code if you want. This is optional and normally links to your payroll system.
- Choose a colour to display in the planner.
- Set the paid rate. For unpaid, select no paid rate, or choose any alternative rate that appears in your system.
Step 3: Save
- Click Add Planner Code. It is now available to book inside the planner.
Step 4: Change a code later
- Find the code under Existing planner codes. The group buttons at the top, such as All Groups, Holiday and Sickness, filter the list.
- Edit it on its row and click the green tick on that row to save.
The groups are fixed: Holiday, Sickness, Absence, Training and Other. You can only add codes beneath them. Holiday codes deduct from entitlement; codes in other groups do not.
Give each sickness code the right paid rate. Create separate codes such as Sick Paid and Sick Unpaid, and pick the one that matches how the absence is paid when booking.
4 Approving a holiday request ▼
When an employee requests holiday through the app, it lands in your inbox to approve or reject. You can do this in the app as a manager, but this guide covers doing it in the software.
Step 1: Open your inbox
- Log in as a manager or admin and click Inbox on the left-hand menu.
- If you have actions waiting, a circle with a number shows how many.
- The inbox has two tabs: Leave Requests and Reports Inbox. This guide covers Leave Requests.
Step 2: Review and action requests
- Your live requests are listed under Leave Requests. Click Accept or Reject on each one.
- To check cover before you decide, click Who Else Is Off. A pop-up lists everyone off on the same day.
Step 3: Check history or find a request
- Click the History tab to see all requests already approved or rejected, with their details.
- To find a particular person’s request, use the search bar to the right of the buttons and type their name.
“Who else is off” is worth a quick look before approving, so you can keep enough cover in a team on any given day.
5 Editing or deleting a booking ▼
You can change a booking, for example if a general sickness later needs a different code, or remove it completely, from the Planner.
Step 1: Find the booking
- Log in as a manager or admin and click Planner on the left-hand menu.
- Move through the months, weeks or days to find the booking you want to change.
- Click the booking to open it.
Step 2: Edit or delete
- To change it, update the details, for example switch the group or code, then click Update Booking at the bottom.
- To remove it completely, click Delete.
If a booking covers several days, you cannot delete just one day of it. You have to delete the whole booking and rebook, either on the employee’s behalf or by asking them to rebook through the app.
6 Creating a holiday group ▼
Holiday groups hold the entitlement rules for your staff: annual entitlement, whether it is tracked in days or hours, the carry-forward cap, and any long-service awards. Set them up under Settings, then assign them to employees.
Use a holiday group change for permanent entitlement changes. Use a holiday adjustment instead for one-off corrections that only apply to the current holiday year (see Making a one-off holiday adjustment below).
Step 1: Open Holiday Groups
- Open Settings, choose Holiday Setup, then select the Holiday Groups tab. This is where company holiday groups are created and managed.
Step 2: Create the new group
- Click the green plus button to add a new group.
- Enter a name, choose whether entitlement is tracked in Days or Hours, enter the full annual entitlement, set the holiday year, and enter the max carry-forward amount.
The carry-forward value is the default amount the system will try to carry forward at year end, but year end still goes through verification.
Step 3: Add long-service rules if needed
- Use the Long Service tab if this group has long-service awards. Tick Enable long service awards for this group.
- Choose whether the award applies at the next holiday year start, or immediately on the employee’s anniversary.
- Add the years-in-service and award amount rows you need. The highest matching rule applies, so enter cumulative totals, for example 3 years = 1, 5 years = 2, 7 years = 3. Employees can still be excluded from long-service awards on their own Holiday tab.
- Click Save group.
Next holiday year start means the extra day starts from the beginning of the holiday year after the milestone, not on the anniversary date.
Step 4: Confirm the group is active
- After saving, check the group appears in the grid and its status is Active.
Step 5: Make it the default for new starters
- Under Fallback Holiday Group, choose the group.
- Click Save fallback. Anyone without a group, including new employees, is placed in it automatically.
Groups can only be deleted while they are not in use. Once a group is assigned or linked to entitlement history, leave it inactive or retired rather than deleting it.
7 Changing an employee’s holiday group ▼
Assign or change an employee’s holiday group from their Holiday tab. The wizard handles how entitlement and booked holidays are recalculated, including mid-year contract changes and conversions between days and hours.
Step 1: Open the employee’s Holiday tab
- Go to People, click More on the employee, and open the Holiday tab.
- Review their entitlement, bookings and balance before changing anything.
Step 2: Open the group change wizard
- Expand Configuration and click the pencil icon next to Holiday group.
Step 3: Choose the type of change
This choice controls how entitlement and booked holidays are calculated:
- Set/correct employee group: for new employee setup or fixing the wrong group. The employee is treated as being on the selected group for the whole holiday year, and all existing booked holidays that year are deducted from that entitlement. It does not split the year.
- Contract change from date: for when contract terms change part-way through the year. The old group closes the day before the change date. Bookings up to that date are deducted from the old group to give a closing balance, which is carried into the new group. Bookings after the change date are deducted from the new group.
For contract changes, the old and new entitlement split is calculated by calendar days in the holiday year. Days round up to the nearest 0.5, hours to the nearest 0.25.
Step 4: Select the new group
- Select the new holiday group. If the current and new groups use the same unit (days to days, or hours to hours), no conversion review is needed.
- If the change moves between days and hours, the wizard adds a Conversion step (see step 7).
Step 5: Enter the effective date (contract changes only)
- For a Contract change from date, choose the date the new group starts from. The previous assignment closes the day before. This step is not shown for Set/correct changes.
Step 6: Review the summary
The summary shows the calculation before anything is confirmed:
- Old period closing balance: entitlement earned under the old group minus old-period bookings.
- New period entitlement: entitlement earned under the new group from the change date to year end.
- Projected new balance: the balance carried in, plus new period entitlement, minus new period bookings.
The balance carried into the new period can be edited before confirming. This value is stored as the opening balance on the new group assignment and used by the holiday calculator.
Step 7: Complete unit conversion if required
- If moving between days and hours, the wizard shows a Conversion tab. Open the conversion review and complete it before continuing, you cannot proceed until it is done.
- The review shows entitlement, brought-forward values, adjustments and bookings, with converted values suggested automatically (for example at 7.5 hours per day, a 1-day booking becomes 7.5 hours).
- You can amend values, add an adjustment, or add a note before confirming.
Step 8: Check the activity log
- After saving, open the employee’s Activity log tab, choose a date range and click Fetch.
- The log records the change: before and after group, effective date, opening balance where applicable, and who made the change.
Permanent entitlement changes should be handled with holiday groups. One-off corrections for a single holiday year should be handled with a holiday adjustment instead.
8 Making a one-off holiday adjustment ▼
A holiday adjustment adds or removes entitlement for one employee in the current holiday year. Use it for one-off corrections, carry-over fixes, goodwill changes or manual balance corrections.
Adjustments are one-time changes and only apply to the current holiday year. For permanent entitlement changes, update the employee’s holiday group instead (see Changing an employee’s holiday group above).
PDF Download the full holiday adjustments guide →
Step 1: Open the employee’s Holiday tab
- Open People, click More on the employee you want to adjust, then go to the Holiday tab.
Step 2: Open the adjustment form
- Expand the Breakdown section and select Add Adjustment. The breakdown shows the current entitlement parts before your adjustment.
Step 3: Enter the adjustment
- Choose the type (Manual, Correction, Goodwill, Carry fix or Other).
- Enter the amount. A positive amount adds entitlement, a negative amount reduces it.
- Add a clear reason or note, then click Add Adjustment.
Step 4: Review the adjustment history
- Open the History section on the Holiday tab and select View Adjustment History to see adjustments for the current holiday year.
Adjustments are view-only once added, they cannot be edited or deleted. If a value was wrong, add another adjustment with the correcting positive or negative amount and note the reason. The history is an audit trail.
9 Viewing and exporting a summary of absences ▼
The Planner summary lists every booking on the calendar you are viewing, with totals, so you can check or export a month’s absences in one go.
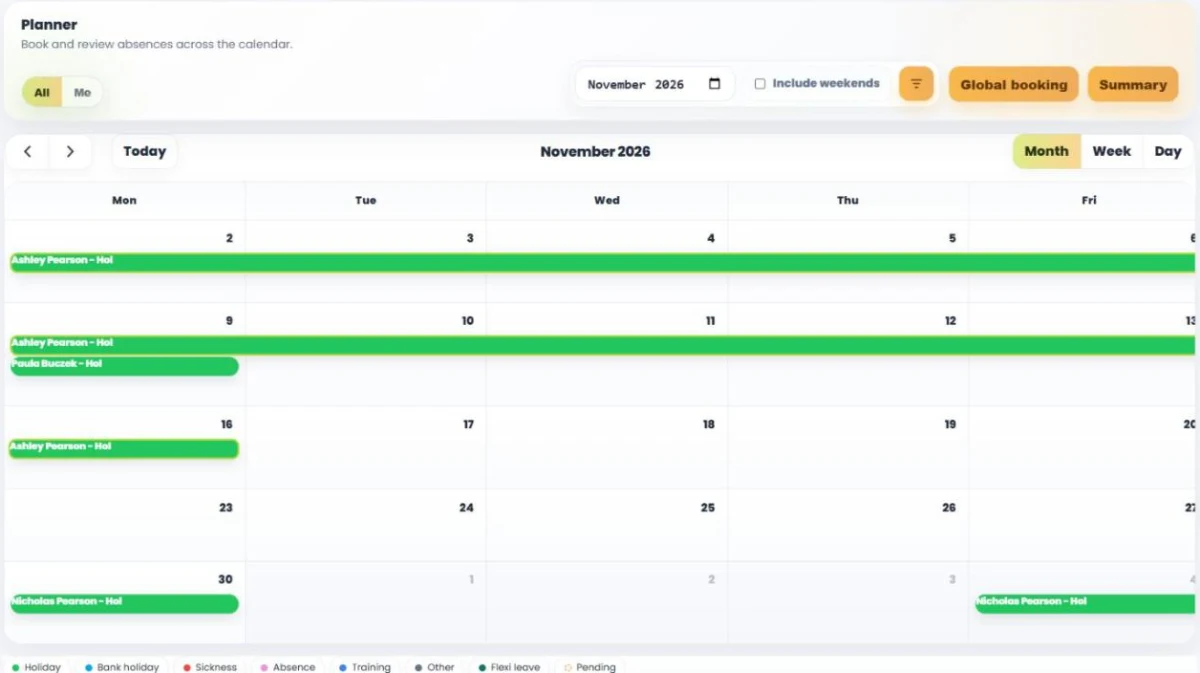
Step 1: Set up the calendar
- Open the Planner and choose the month, using the date box or the arrows. Pick Month, Week or Day at the top right of the calendar.
- Choose All to see everyone, or Me to see just your own bookings.
- Tick Include weekends if you want to see weekend bookings.
- To narrow it down, click the filter button and choose a department, site, booking status, group, subtype or individual employees.
Step 2: Open the summary
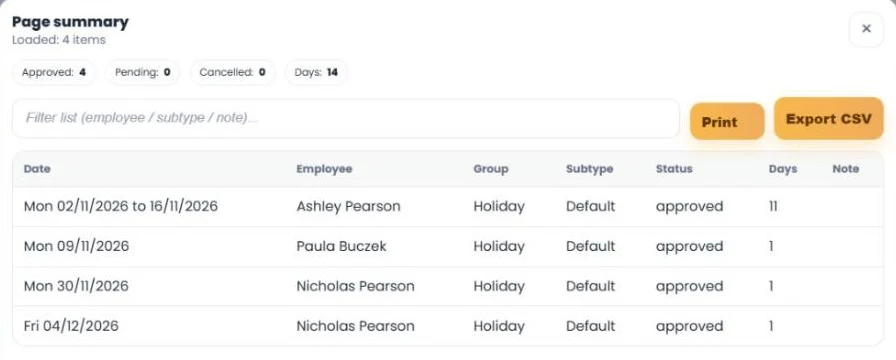
Click Summary at the top right. The Page summary shows how many bookings are Approved, Pending and Cancelled, the total Days, and a table of Date, Employee, Group, Subtype, Status, Days and Note. Half days show as 0.5.
Step 3: Filter, print or export
- Type in the filter box to narrow the list by employee, subtype or note.
- Click Print for a paper copy, or Export CSV to open it in a spreadsheet.
The summary only includes the bookings loaded on the calendar, so set the month and filters you want before you open it.