
Exception parameters define the boundaries and rules for employee attendance within a shift. These settings help monitor punctuality and manage automated exceptions like late arrivals or early departures.
- Exception Parameters when setting up a shift.
- Managing Schedules
- Creating a Rotating Shift Pattern
- Adding and Editing Notes in Exceptions
- How to Set Up Hourly Rates Within a Shift
- Rounding Groups & Roundings
- How To Set Up Breaks
- Creatring an Open Shift
- Assigning an RFID Card or FOB to an Employee
- Adding a New Employee to the System
- Creating a flexi shift
- Setting Up Absence Constraints
- Managing Filters
- Hiding Holidays and Sickness from Exceptions
- Not Receiving Clocking Information in Realtime
- How to Export Payroll Data via CSV in Realtime
- How to Update Your License in Realtime
- How to Manually Add a Time Entry in Realtime
- Adding a Subcategory Absence Group in Realtime
- How to set site by hardware or Personnel record
- Managing Exceptions When NoShift is Selected
- How to Create a Shift That Runs Past Midnight
Exception Parameters – Step-by-Step Guide
Key Parameters and Their Functions
Start
- Defines the expected shift start time.
- Any clock-in recorded after this time will be flagged as late.
- Pay may be deducted unless a grace period has been configured.
End
- Defines the expected shift end time.
- Any clock-out before this time will be flagged as “Clock Out Before Shift Finished”.
- Pay may be deducted unless a grace period is set.
Optional Time Controls
Earliest Start
- Sets the earliest time an employee is allowed to clock in.
- Example: If set to 06:30, clocking in at 06:25 will not be accepted for this shift.
Flag Early Start
- This setting alerts you when an employee clocks in too early.
- Example: If the shift starts at 07:00 and the flag early start is set to 06:30, only clock-ins before 06:30 will trigger an alert.
Latest Start
- The latest time an employee is allowed to clock in.
- Example: If the latest start is set to 07:59, any clock-in after 07:59 will not be accepted as a start time.
- The system will instead create a “Not Clocked In” (NCI) exception and interpret the clock-in as a clock-out.
Flag Late Finish
- Used to alert if an employee stays beyond expected hours.
- Example: If the shift ends at 17:00 and the flag late finish is set to 17:30, any clock-out after 17:30 will trigger an alert.
Latest End
- The cutoff time for recording clock-outs.
- Example: If the shift ends at 17:00 and the latest end is 17:30, any clock-out after 17:30 will be blocked.
- The system will auto clock out the employee at the defined latest end time.
Absence Check
- The system will perform an absence check at the configured time.
- This identifies any employees who have not clocked in for their shift.
Summary
These parameters are essential for managing exceptions automatically and ensuring timekeeping rules are enforced. Proper configuration ensures accurate reporting, prevents time theft, and alerts you to unusual attendance behavior.
Help Guide: Managing Schedules
This guide walks you through the process of creating and assigning work schedules in the system.
Part 1: Creating a New Schedule
Step 1: Navigate to the Schedule Section
From the left-hand side menu, click:
- Time and Attendance
- Then select Shifts and Schedules
Step 2: Start a New Schedule
- On the Shifts and Schedules screen, locate the Schedule drop-down at the top of the screen.
- To the right of the drop-down, click New.
- The right-hand side of the screen will now appear blank.
Step 3: Configure the New Schedule
- Enter a name for your new schedule.
- Choose a schedule type: These types are covered at the bottom of this document
- Select the first day of the week.
- Choose any relevant overtime period.
Step 4: Add Shifts
From the list of shifts on the left-hand side, drag and drop a shift onto the desired day(s).
Example
Monday – 9:00 to 5:00
Tuesday – 6:00 to 2:00
Wednesday – 6:00 to 2:00
Thursday – 9:00 to 4:00
Friday – 6:00 to 2:00
For days off, right-click on the day and select Day Off from the pop-up menu.
Step 5: Save the Schedule
- Once all shifts are added, click Apply to save the schedule.
Part 2: Assigning a Schedule to an Employee
Step 1: Navigate to Employee Management
- Go back to the main menu on the left.
- Click Personnel, then select Manage Employees.
Step 2: Assign the Schedule
- Select the desired employee from the list on the left.
- Click Edit.
- In the Employee Registration section, find the Work Schedule tab.
- From the drop-down menu, choose the new schedule you created.
- Click Apply to assign the schedule to the employee.
Step 2: Assign the Schedule
- Select the desired employee from the list on the left.
- Click Edit.
- In the Employee Registration section, find the Work Schedule tab.
- From the drop-down menu, choose the new schedule you created.
- Click Apply to assign the schedule to the employee.
You’re Done!
Your new schedule is now live and assigned to your employee. Repeat this process to manage and assign different schedules as needed.
Creating a Rotating Shift
Pattern
This guide will walk you through the steps to create a rotating shift pattern using the Realtime Time & Attendance system.
Step 1: Access the Shifts & Schedules Area
- Open Realtime and log in with your credentials.
- On the left-hand side menu, under ‘Time & Attendance’, click on ‘Shifts & Schedules’.
Step 2: Create a New Rotating Schedule
- At the top of the page, locate the drop-down menu labeled ‘Schedule’.
- To the right of it, click the ‘New’ button.
- You will be prompted to:
– Give the schedule a name.
– Select a schedule type.
- From the schedule type drop-down, select ‘Rotating’.
Step 3: Configure Week 1 of the Rotation
- A box will appear showing one week of the schedule.
- Use the shift bank on the left-hand side to drag and drop shifts onto each day.
If the shift you need doesn’t exist, refer to the ‘Creating a New Shift’ guide.
- To mark a day as a day off, right-click on the day and select ‘Day Off’.
Step 4: Add Additional Weeks
- Above the week grid, click the ‘New’ button again to add a second week.
- Populate Week 2 with the appropriate shifts.
- Again, right-click and choose ‘Day Off’ where needed.
Step 5: Finalize the Rotating Schedule
- Once your rotating pattern is complete, set the ‘Week 1 Start Date’.
- Click ‘Apply’ to save the rotating schedule.
Optional: Assign Weekly Rates
You can also assign weekly pay rates to these rotating schedules.
For instructions, refer to the ‘Weekly Rates’ guide.
You have now successfully created a rotating shift pattern in Realtime. For further assistance, consult the relevant help guides or contact support.
Adding and Editing Notes in Exceptions
Introduction
This guide explains how to add and view notes in the Exceptions section of the Realtime Time & Attendance system. These notes provide context for changes made to clock-in or clock-out times, helping maintain a clear audit trail.
Step 1: Access the Exceptions Area
- Open Realtime and log in with your credentials.
- From the left-hand side main menu, go to:
- Time & Attendance → Exceptions
Step 2: View an Existing Note
- If a time entry has an existing note attached, you’ll see a yellow square next to the modified time.
- Click on the yellow square to view the note. You’ll be able to see:
- Who edited the time
- The date and time the edit was made
Step 3: Add a New Note
- Find the exception entry you wish to update.
- On the right-hand side of that entry, click the Edit action.
- Make the necessary time changes.
- Below the change box, you’ll find a Comment section.
- Type your comment into the box and click the Add Comment button.
- Finally, click Apply to save your changes.
- The system will save your note with a date and time stamp, along with the name of the user who made the change.
Step 4: Confirm the Note Has Been Saved
- After saving, a yellow square will appear next to the updated time, indicating a note has been attached.
- You can click the yellow square at any time to view the note details.
That’s it! You’ve successfully added or viewed a note in the Exceptions section. If you need help with anything else, feel free to contact your administrator or support team.
How to Set Up Hourly Rates Within a Shift
Step 1: Open a Shift
- 1.1. Navigate to the Shifts section in your system.
- 1.2. Select or create the shift you want to configure.
Step 2: Go to the Rates Tab
- 2.1. Once inside the shift setup, locate and click on the Rates tab.
Step 3: Change from Daily Rates to Hourly Rates
- 3.1. In the Rates section, find the checkbox for Daily Rates.
- 3.2. Untick the checkbox to switch to Hourly Rates.
Step 4: Add Rate Periods
- You can now define specific time ranges with different pay rates.
First Rate Period (e.g. Basic Rate Before 6am):
1. Click New.
2. Set the Start Time to 02:00 and the End Time to 06:00.
3. Select Basic Rate from the rate options.
4. Save or confirm this entry.
Second Rate Period (e.g. Overtime from 6am–8am):
1. Click New again.
2. Set the Start Time to 06:00 and the End Time to 08:00.
3. Choose the Overtime Rate.
4. Save or confirm this entry.
Third Rate Period (e.g. Basic Rate from 8am–6pm):
1. Click New again.
2. Set the Start Time to 08:00 and the End Time to 18:00.
3. Select Basic Rate again.
4. Save or confirm this entry.
Step 5: Review Your Rate Setup
- You should now see three different hourly rate bands:
2:00am – 6:00am: Basic
6:00am – 8:00am: Overtime
8:00am – 6:00pm: Basic
Step 6: Save the Shift
Ensure all changes are saved to apply the new hourly rate structure.
Rounding Groups & Roundings – Step-by-Step Guide
Step 1: Access the Shift Settings
-
-
- Open the shift where you want to apply a rounding group.
- Navigate to the Rounding & Violation tab within the shift setup
-
Step 2: Select or Create a Rounding Group
- If a rounding group already exists, click Edit to amend it.
- To create a new rounding group, click New.
Step 3: Define the Rounding Rule
Each rounding group must include at least one rule. You may add multiple rules if needed.
When setting up a rule, you must configure the following:
- Time or Interval:
You can round to a specific time (e.g., entering 08:00 will round all clockings during that period to exactly 08:00).
Alternatively, you can round by a time interval (e.g., 15 minutes).
- Rounding Direction:
Choose whether to round In, Out, or Both directions.
- Rounding Type:
Specify whether to round Up, Down, or Up and Down depending on therequirement.
- Examples:
Rounding up by 15 minutes: A clocking at 08:55 will round to 09:00.
Rounding down by 15 minutes: A clocking at 08:55 will round to 08:45.
- Step 4: Save the Rounding Group
Once the rounding rules have been configured, save the rounding group.
The rounding group will now be available for use in shift setup
- Step 5: Apply the Rounding Group to a Shift
Return to the shift configuration and go to the Rounding & Violation tab.
Click Apply or Save & Close to confirm the changes.
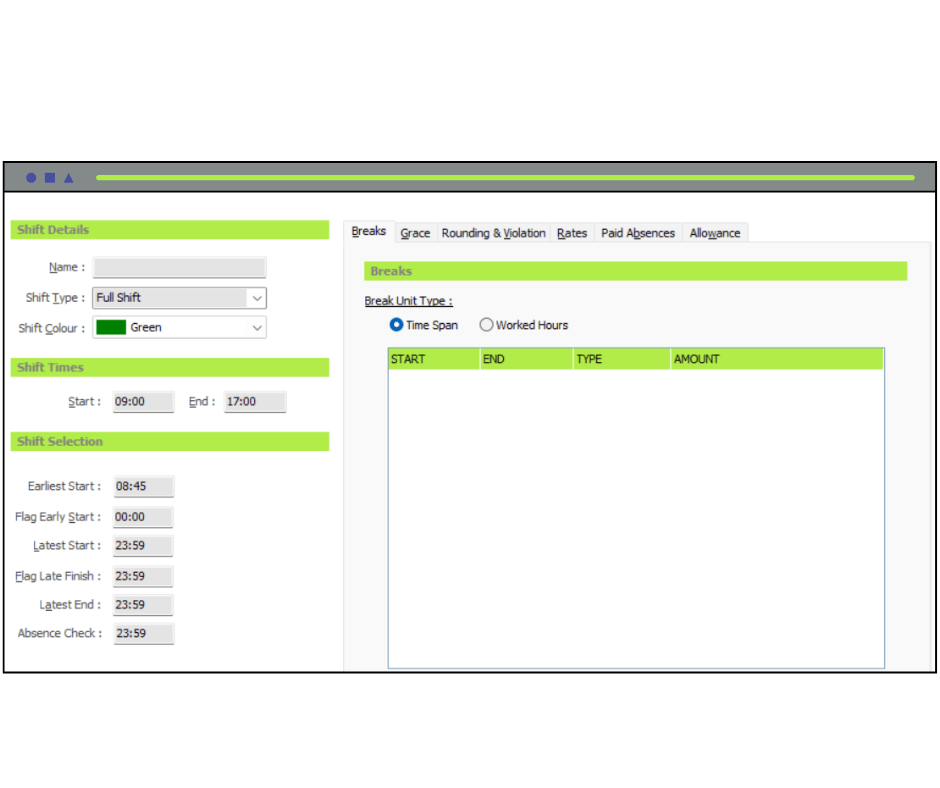
How To Set Up Breaks
When setting up breaks in the system, there are two main methods you can use:
- Break Type Options
Time Span
This method applies the break if the employee works during a specific time range.
- Example: If a break is set between 11:00 and 14:00, and the employee works during those hours, the break will apply automatically.
Worked Hours
This method applies the break after an employee has worked a defined number of hours.
- Example: A 30-minute break may be triggered automatically after 6 hours of work.
Although the logic behind each method differs, the setup process is the same for both.
- Break Setup Details
Type
You must choose one of the following break types:
- Paid
The break time is paid as long as the employee does not exceed the specified break duration. - Auto Deduct
The break is automatically deducted from the employee’s hours, whether or not they clock out.-
- Note: The system will not deduct break time twice if the employee does clock out, unless the break exceeds the allowed time or occurs outside the specified time span.
-
- Unpaid
This is an unpaid break and is only deducted if the employee clocks out. - Amount
Specify the duration of the break. This can be entered in hours or minutes depending on the policy (e.g., 00:30 for a 30-minute break).
- Summary
This setup allows you to automate how breaks are applied based on either time of day or total hours worked, with options for paid or unpaid time. The system also supports advanced logic to avoid duplicate or incorrect deductions.
Let me know if you’d like this formatted as a training guide or part of a user manual.
Help Guide: Creating an OpenShift
This guide will walk you through how to create an OpenShift and explain its purpose in the scheduling system.
Step 1: Navigate to Shifts and Schedules
From the left-hand side menu, go to:
- Time and Attendance
- Then select Shifts and Schedules
Step 2: Create a New Shift
- On the Shifts and Schedules screen, look to the list of your shifts on the left-hand side.
- Scroll down to the bottom and click ‘New’.
- Give your new shift a name.
Step 3: Select Shift Type
- Under ‘Shift Type’, you’ll see three options: Full Shift, Part Shift, and OpenShift.
- For this guide, select ‘OpenShift’.
What is an OpenShift?
An OpenShift provides maximum flexibility by allowing staff to clock in and out at any time, as long as they complete the total expected hours for the shift.
Key Features of OpenShift
- No set start or end times
- Employees must complete the required hours (e.g., 8 hours)
- Set a maximum limit (e.g., 12 hours) to restrict overtime
- Exceptions will be flagged only for: Missing clock-out or Not meeting expected hours
- Lateness or early starts are not flagged
Step 4: Define Hours
- After selecting OpenShift, the start and end time fields will disappear.
- Enter the ‘Expected Hours’ (e.g., 8).
- Set ‘Maximum Hours’ (e.g., 12).
Step 5: Configure Additional Settings
You can configure other options such as breaks, rounding, and pay rates just like a standard shift.
Example: Set a Basic Rate
You can configure other options such as breaks, rounding, and pay rates just like a standard shift.
- Click on ‘Rates’ and then click ‘New’.
- Assign it a basic rate.
- Set the amount up to 12 hours.
- Choose not to include rounding, if desired.
Example: Configure Paid Absences
- Under ‘Paid Absences’, select how much time to pay for holidays.
- For a full shift, choose basic rate and enter 8 hours.
- For split shifts, assign 4 hours for the first half and 4 for the second half.
Step 6: Save Your OpenShift
Once all the settings are configured, scroll to the bottom of the screen and click ‘Apply’.
Your OpenShift is now ready and can be used to build employee schedules.
Assigning an RFID Card or FOB to an Employee
This guide walks you through the steps required to assign a new RFID card or FOB to an employee, or replace an existing one.
Step 1: Navigate to Employee Management
On the left-hand side menu, go to:
- Personnel
- Then click Manage Employees
- In the list of employees, select the employee to whom you want to assign the RFID card or FOB.
- If the employee is not listed, you can add them as detailed in a previous guide.
- Click Apply to confirm the employee selection.
Step 2: Access the Enrolment Tab
At the top of the screen, locate and click the Enrolment tab.
- Note: If you do not see the Enrolment tab, it may be due to your user privilege level.
To enable enrolment access
- Go to Settings > User Management
- Ensure the Enrolment option is ticked for your user role.
- If you don’t have the required permissions, please contact your system administrator to grant access.
Step 3: Assign or Replace the RFID Card/FOB
- Within the Enrolment tab, click Edit.
- Locate the RF Card ID field.
- In the RF Card ID field:Enter the serial number printed on the back of the RFID card or FOB.
- Click Apply to save.
To Replace an Existing RFID Card/FOB
- Simply delete the existing number in the RF Card ID field.
- Enter the new serial number, then click Apply.
You’re done!
The RFID card or FOB is now ready for use by the assigned employee.
Adding a New Employee to the System
This guide walks you through the steps required to assign a new RFID card or FOB to an employee, or replace an existing one.
Step 1: Navigate to Employee Management
On the left-hand side menu, go to:
- Personnel
- Then click Manage Employees
Create a New Employee Entry
- On the bottom right of the screen, click the New Employee button.
- This will generate blank fields at the top of the screen for you to complete.
Enter Employee Information
- Fill in each field one by one (e.g., name, ID number, department, etc.).
- Make sure all necessary information is entered accurately.
Add a Profile Picture (Optional)
- Click on the image icon above the form to upload or select a profile picture.
Save the Employee Record
- Once all fields are completed, click Apply to save the information.
- This action will send the new employee data to the clocking terminal.
Enrol Biometric Data
- At the clocking terminal, you can now enrol either the face or fingerprint of the new employee. (please see enrolling biometric guide)
Assign an RFID Card or FOB (Optional)
To assign an RFID card or FOB to this employee, please refer to the guide titled:
“Enrolling RFID FOBs.”
Creating a flexi shift
*Please note do not convert a full shift to flexi please create a new flexishift and assign it to the schedule*
FlexiShifts allow flexibility in working hours while maintaining core business needs perfect for employees who just need to work a set number of hours within a flexible window.
1.Navigate to Shifts and Schedules:
- Go to the left-hand side menu.
- Click Time and Attendance
- Shifts and Schedules.
Step 2: Select and Edit the Shift:
On the left-hand side, select the shift you want to change.
Click Edit or simply double-click on that shift.
- Change Shift Type:
- In the pop-up window, change the Shift Type from FullShift to FlexiShift.
(please note you may have to activate this in setting to do this go to Settings – General – Preferences and ensure flexi schedules are ticked. You can find more information regarding flextime in our flextime guide)
Setting Up a FlexiShift
Let’s walk through configuring a FlexiShift for a typical scenario.
Define the Flexi Window
- Start Time (Earliest): The earliest possible time the employee can begin work. Example: 8:00 a.m.
End Time (Latest): The latest possible time they can finish work. Example: 6:00 p.m.
Set Required Work Duration
- Input the number of required hours the employee must work that day. Example: 8 hours
Establish the Core Hours (Core Period)
- Set the mandatory time range when the employee must be present. Example: From 10:00 a.m. to 4:00 p.m.
The system will only trigger lateness if the employee clocks in after 10:00 a.m., based on your core period settings.
Add Additional Settings
- Breaks: Add meal or rest breaks according to your company policy
- Rounding Rules: Set up how start and end times should be rounded.
- Rates: Apply any relevant pay rates or multipliers.
- Paid Absences: Add any applicable paid leave or absence types.
Save the Shift
Once all fields are configured, click Apply to save your Flexi Shift. You now ready to drag this shift into a new Schedule or replace shift within an existing schedule staff are already using.
Quick Tips for Managing FlexiShifts
- Use FlexiShifts to balance business needs with employee flexibility.
- Always define clear core hours to ensure team collaboration.
- Regularly review and adjust shifts based on attendance trends or operational needs.
Setting Up Absence Constraints
Realtime includes a helpful feature that allows you to limit the number of employees who can be off at any one time from a particular department. This guide walks you through the process of setting up and managing Absence Constraints.
Step 1: Navigate to Absence Constraints
- Open Realtime and log in.
- From the left-hand side menu, go to:
– Settings → Holiday Groups → Absence Constraints
Step 2: Add a New Absence Constraint
- In the Absence Constraints section, you’ll see an empty box at the top and various settings below.
- Click the ‘New’ button in the bottom-left corner to enter edit mode.
- Under the ‘Department’ dropdown, select the department you wish to apply the constraint to.
- *** If the department you need isn’t listed, or if you’d like to add a new one, please refer to the Filters Guide on how to set up filters.
- Choose the date settings:
- Select ‘Default’ to make the constraint permanent with no end date.
- Or, define a date range (e.g., for the festive period) to apply the constraint temporarily.
- Enter the maximum number of employees allowed to be off from the selected department at any one time.
- Click ‘Apply’ to save your settings. The new constraint will now appear in the list at the top.
Step 3: Edit an Existing Constraint
- To edit an existing constraint, click on the constraint from the list at the top.
- Click the ‘Edit’ button below.
- The editable fields will become active again, allowing you to make your changes.
- Once you’re done, click ‘Apply’ to save your changes.
That’s it! You’ve successfully set up or updated absence constraints. This ensures better coverage and fairness in managing team availability.
Managing Filters
Filters in Realtime allow you to customise and organise data for better reporting and user management. This guide walks you through how to set up, edit, and delete filters such as Sites, Departments, Job Titles, and more.
Step 1: Access the Filters Section
- Open Realtime and log in.
- On the left-hand side menu, click ‘Settings’.
- Under ‘Settings’, select ‘General’, then click on ‘Filters’.
Step 2: Explore Available Filter Categories
On the left side of the Filters section, you’ll find a list of available filter categories, including:
- Sites
- Departments
- Job Titles
- Courses
- Areas
- Assembly Points
- Payroll Groups
- Expense Types
You also have the option to create a custom filter by ticking the ‘Custom Filter’ box and assigning it a name.
Step 3: Add a New Filter Item
- Select the category you wish to update (e.g., Sites).
- On the right-hand side, you’ll see a box labeled ‘Name’.
- To add a new item, click the ‘New’ button.
- Enter a name for the new item.
- Click ‘Apply’ to save your changes.
Step 4: Edit an Existing Filter Item
- Select the category (e.g., Sites) and click on the item you want to edit.
- Click the ‘Edit’ button.
- Make your desired changes to the name.
- Click ‘Apply’ to save the edits.
Step 5: Delete a Filter Item
- Click on the filter item you want to remove.
- Click the ‘Delete’ button at the bottom.
- Confirm and then click ‘Apply’ to finalise the deletion.
Remember: Any time you make changes whether adding, editing, or deleting filters always click ‘Apply’ in the bottom-right corner to save them.
Hiding Holidays and Sickness from Exceptions
In Realtime, holidays and sickness can appear as exceptions by default. This guide explains how to stop those entries from showing in the Exceptions tab.
Step 1: Hide Holidays from Exceptions
- Open Realtime and log in.
- On the left-hand side menu, go to ‘Setup’ → ‘Settings’.
- Within Settings, click ‘General’, then select ‘Holiday Groups’.
- On the left-hand side, you’ll see a list of your holidays and holiday codes.
- Under each holiday code, you’ll find individual holiday reasons.
- Click ‘Edit’ for each holiday reason.
- Ensure the ‘Display’ box is **unticked** to prevent it from appearing as an exception.
- Click ‘Apply’ to save changes.
Step 2: Hide Sickness from Exceptions
- Stay in ‘Settings’ and return to the ‘General’ section.
- This time, click on ‘Absence Groups’.
- Select the relevant type of absence (e.g., sickness) from the list on the left.
- Click ‘Edit’ for each absence reason you wish to hide.
- Ensure the ‘Display’ box is **unticked**.
- Click ‘Apply’ to save your settings.
That’s it! Holidays and sickness will no longer appear in the Exceptions tab, helping you keep the exceptions area focused on attendance-related anomalies only.
Not Receiving Clocking Information in Realtime
Follow the steps below to troubleshoot and resolve issues with missing clocking information in Realtime:
Step 1: Check the Clocking Machine Connection
Go to the clocking machine where the clocking times are not sending.
In the top right-hand corner, you will see an icon of a Cylinder.
If there is a red cross or red globe through the Cylinder, the clock is not connected to the internet or there is a network issue.
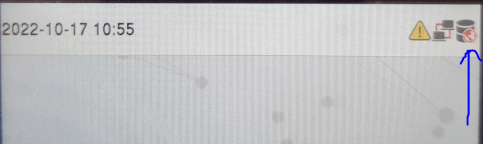
In this case, please ask IT to check the server for the service called RealservV2, this talks to the clocks and must always be running. When IT start or restart it then the Red in the icon will disappear and your clocking will come down a few minutes later when you refresh your Realtime screen.
Let me know if IT have any issue starting this service and will join them on the server.
If the red has now disappeared from the icon and clocking did not automatically send then continue to step 2.
Step 2: Retrieve Missing Data in Realtime
If the clock is connected to the internet and Network
- – Go back to Realtime.
- – Navigate to: Settings > General > Maintenance.
- – In the Maintenance section, click on ‘Get Attendance Log’.
- – Select the date range and the employees for whom you wish to retrieve data.
- – Click OK.
Realtime will then retrieve any missing clocking data from the clock, and the data will appear in the system.
If times have appeared and find that some days have all the times in the IN column, then move to Step 3.
Step 3: Shuffle times in Realtime into correct order
Note that the following corrections are in bulk and will save time correcting any data manual.
- – Go back to Realtime.
- – Navigate to: Settings > General > Maintenance.
- – In the Maintenance section, click on Shuffle Clockings.
- – Select the date range and the employees for whom you wish to correct the times.
- – Click OK.
Note that this will not affect any normal clocking and once refreshed the reports, the times will be correct to the IN and OUT column and calculated.
If you use rounding and the rounding are incorrect due to all times going into the IN column and want to recalculate the Paid amount again after the shuffle then , move to step 4
Step 4: Recalculate times in Realtime after shuffle
- – Go back to Realtime.
- – Navigate to: Settings > General > Maintenance.
- – In the Maintenance section, click on Recalculate Clockings.
- – Select the date range and the employees for whom you wish to correct the times.
- – Tick the box Recalculate Times
- – Tick box Ignore Modified times if want to ignore any that you have already changed
- – Click OK.
This will look at the IN and OUT time again, then apply the rounding again, then calculate the paid hours.
How to Export Payroll Data via CSV in Realtime
Step 1: Navigate to Payroll Export
- Open Realtime.
- On the left-hand side menu, click on Reports.
- Select Payroll Export from the list.
Step 2: Set Export Parameters
Once you click Payroll Export, a pop-up window titled Export will appear. Complete the following sections:
1. Export Type
Choose from one of the predefined options:
- Weekly
- Bi-weekly
- Monthly
- Monthly (Last Day)
- OR tick the Use Dates box to define a custom date range.
2. Payroll Groups
- If you want to include all employees, make sure all boxes are ticked.
- If you’re paying specific groups only, tick the relevant boxes.
3. Exclude Leavers (under Personnel)
- Tick this box if you do not want to pay employees who have left but logged hours in the selected period.
- Untick it if you do want to pay them.
4. Export Format
- In the Export Type section, ensure CSV is selected.
5. Output File
- Choose where you want to save the file on your computer.
- A file browser will appear—select your desired folder and filename.
Step 3: Export and Open
- Once all settings are confirmed, click OK.
- Your payroll data will now be exported and saved as a CSV file.
- You can open this file in Microsoft Excel or any spreadsheet program.
How to Update Your License in Realtime
Step 1: Log Into Realtime
- Open Realtime and log in with your credentials.
- On the left-hand side menu, go to Setup and then select Settings.
Step 2: Access System Info
- Across the top of the screen, click on the “System Info” tab.
- This should default to the “License” tab.
Step 3: View Your Current Modules
- Scroll down to the bottom of the License list.
- You will see a section called “Modules” – these are all the modules you are currently subscribed to.
Step 4: Update Your License
- For any changes or updates, click on “Update License”.
- Your updated module list will now be visible.
You will also see updated details including your:
- User Limit
- Network Users
- Hardware Limit
How to Manually Add a Time Entry in Realtime
Follow these steps to add or correct time manually in the Realtime system:
Step1. Open Realtime
Launch the Realtime application on your computer.
Step 2. Go to Time and Attendance
Navigate to the Time and Attendance section in the menu.
Step 3 Access Exceptions
Click on Exceptions to view the attendance records.
Step 4 Click on “All Data”
Scroll to the bottom of the screen and select All Data. This will display a full list of time records in the system.
Step 5. Select an Employee
At the top of the screen, use the Select Employee search bar. Choose the employee whose time record you want to edit or add.
Step 6. Right-Click to Add a New Entry
In the times grid, right-click anywhere. Choose Create New Date from the context menu.
Step 7. Enter Time Details
Fill in the following fields:
- Date – The date of the shift.
- Expected Shift Time – Scheduled start and end time.
- Time In – Actual clock-in time.
- Time Out – Actual clock-out time.
Step 8. Recalculate
Click Recalculate. The system will automatically calculate the total hours based on the entered times.
Step 9. Accept and Apply
Adding a New Subcategory Under an Absence Group in Realtime
Follow these steps to add a new category (also known as a subcategory) under an existing absence group in Realtime.
Step1. Open Realtime
Launch the Realtime application on your computer, and log in with your credentials.
Step 2. Navigate to Setup
On the top menu or navigation panel, select Setup.
Step 3 Go to Settings
Inside the Setup screen, click on Settings.
Step 4 Access Absence Groups
Once in Settings, look for the section labeled Absence Groups.
You will see a list of predefined absence groups on the left-hand side. These typically include:
- Sickness
- Absence
- Miscellaneous
- Bank Holiday
- Training
- TOIL
- Non-Working Day
Step 5. Select an Absence Group
For this guide, we’ll add a new subcategory under Miscellaneous.
Click on Miscellaneous from the list on the left.
Step 6. Add a New Miscellaneous Code
At the bottom of the screen, locate the section called Miscellaneous Codes.
Click the New button at the bottom.
Step 7. Enter Category Details
- Name: Enter a short name (e.g., Com)
- Description: Enter a full name or explanation (e.g., Compassionate)
- Colour Code: Select a colour for easy identification
- Display: Tick the checkbox to make it visible in the planner
- Rate: Choose a default rate (e.g., Basic Rate)
(Note: The rate can be changed later when booking the absence.)
Step 8. Apply Changes
Once all fields are filled, click Apply to save the new subcategory.
Done!
The new category (e.g., Compassionate Leave) is now ready to be used.
You can now book it via the planner using the default rate you selected.
How to Specify Site Reference for reports
You can configure whether an employee’s site is determined by the location of the clocking hardware or by the employee’s assigned site in their personnel record.
Step1. Open Realtime
Launch the Realtime application on your computer, and log in with your credentials.
Step 2. Navigate to Setup
On the top menu or navigation panel, select Setup.
Step 3 Go to Settings
Inside the Setup screen, click on Settings. Once in Settings, select General and then Preferences.
Step 4 Locate On-Site/Off-Site Status
Scroll down the page until you find the On-Site, Off-Site Status section.
Step 5. Set Site Reference From
In this section, locate the option Set Site Reference From.
- Hardware – the site is determined by where the employee clocks in (the clocking hardware).
- Employee – the site is determined by the employee’s assigned site in their personnel file.
Step 6. Apply Changes
Once you’ve selected the correct option, click Apply and then Close.
Step 7. Restart if Required
You may need to restart Realtime for these changes to take effect.
Managing Exceptions When NoShift is Selected
A NoShift Selected exception occurs when an employee clocks in on a day they are not scheduled to work. This may happen if the employee is covering for someone else or has been asked to work outside of their standard schedule. When this happens, the system records the Time In and Time Out, but it does not calculate paid hours at the correct rate.
Follow the steps below to amend this exception:
Step1. Open Realtime
Launch the Realtime application on your computer, and log in with your credentials.
Step 2 : Navigate to Exceptions
-
Go to Realtime in the system menu.
-
On the left-hand side, click Exceptions.
Step 3: Filter for NoShift Selected Exceptions (optional)
-
Use the filters at the top of the screen.
-
Select NoShift Selected to display only these exceptions.
Step 4: Edit the Exception
-
Locate the exception you need to amend.
-
On the right-hand side, click the Edit icon (small pencil).
Step 5: Recalculate Hours
-
In the Edit screen, click the Calculator icon.
-
A pop-up window will appear titled Select Shift.
-
Choose the correct shift that the employee worked/covered.
-
Click OK.
Step 6: Apply and Accept
-
The system will now recalculate the hours based on the rules of the selected shift.
-
Confirm that the Paid Hours field is updated correctly.
-
Click Accept.
-
Click Apply to save your changes.
The exception is now updated, and the corrected data is ready for payroll processing.
How to Create a Shift That Runs Past Midnight
Step1. Open Realtime
Launch the Realtime application on your computer, and log in with your credentials.
Step 2 : Navigate to Shifts and Schedules
-
On the left-hand side menu, select Time and Attendance.
-
Click on Shifts and Schedules.
Step 3: Create a New Shift
-
Once inside Shifts and Schedules, look to the bottom left-hand corner of the screen.
-
Underneath the list of existing shifts, click New.
- A pop-up window will appear to create your new shift.
Step 4: Enter Shift Details
-
Shift Name: Enter a name for the shift.
-
Example: Weekday Night Shift
-
-
Shift Type: Select Full Shift.
- Start Time: Enter the start time as 2200 (10:00 PM).
-
Finish Time: Because this shift runs past midnight, use the 48-hour clock format.
-
For example, if the shift ends at 4:00 AM, enter 2800 instead of 0400.
-
- Note: Although the shift is entered in 48-hour format, all reports and exceptions will still display in 24-hour time.
Step 5: Add Shift Details
You can now set up additional options for the shift:
-
Breaks
-
Grace Periods
-
Rounding Rules
-
Rates
For more detailed instructions on these settings, please refer to the How to Set Up a Shift guide.
Step 6: Apply the Shift
-
Once all information is entered and reviewed, click Apply to save the shift.
Your new overnight shift will now be available in the list and ready to use.
The exception is now updated, and the corrected data is ready for payroll processing.